Replacing the tag battery
Battery recommendations
We would recommend the batteries below for each of the tags:
Wearable Tag
When replacing the battery Pozyx recommends to use Murata's CR2450 battery. Other recommended suppliers are Varta, Renata, and Panasonic. However, even though we expect and observed similar behavior, since these batteries were less thoroughly tested we cannot guarantee the same battery performance.
Industrial Tag
Panasonic CR2477
Murata CR2477x
Operation with alternative batteries cannot be guaranteed and is therefore not recommended.
Wearable Tag
The Wearable Tag uses a standard 3V/600mAh CR2450 coin cell battery that can easily be replaced (see the recommendations above)
Note that replacing the battery voids any guarantees on water ingress protection
IP65 (Tracking variant)
IP20 (Interactive variant)
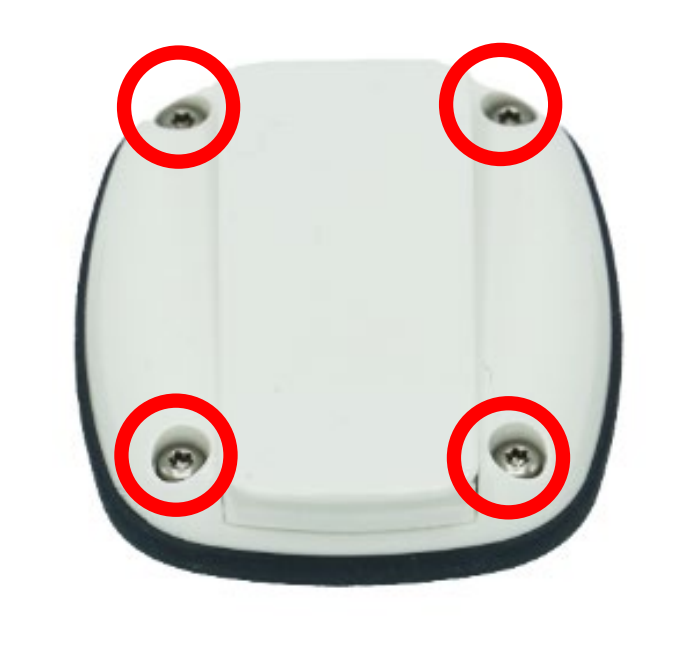
Turn over the Wearable Tag with the back facing up towards you.
Use a Torx T6 screwdriver to remove the 4 screws, and lift the back cover.
Remove the board from the top shell
Push the coin cell out of the battery holder.
Place a new CR2450 coin cell battery in the battery holder, positive side up.
Place the board back in the top shell. Make sure the board is well aligned on the pins inside the casing and put the back shell in place
Tighten the 4 screws again to fix the back shell.
Industrial Tag
The Industrial Tag uses a 3V/1000mAh CR2477 coin cell battery that can easily be replaced (see the recommendations above).
Note that replacing the battery voids any guarantees on water ingress protection (IP66&IP67)
Turn over the Industrial Tag with the back facing up towards you.
Use a Torx T6 (outdoor version) or Torx T8 (indoor version) screwdriver to remove the 3 screws, and lift the back shell.

Remove the board from the top shell.
Push the coin cell out of the battery holder.
Place a new CR2477 coin cell battery in the battery holder, with the positive side up.
Place the board back in the top shell. Make sure the board is well aligned on the pins inside the casing and put the back shell in place.
Tighten the 3 screws again to fix the back cover.